
Two-Container Exclusive House

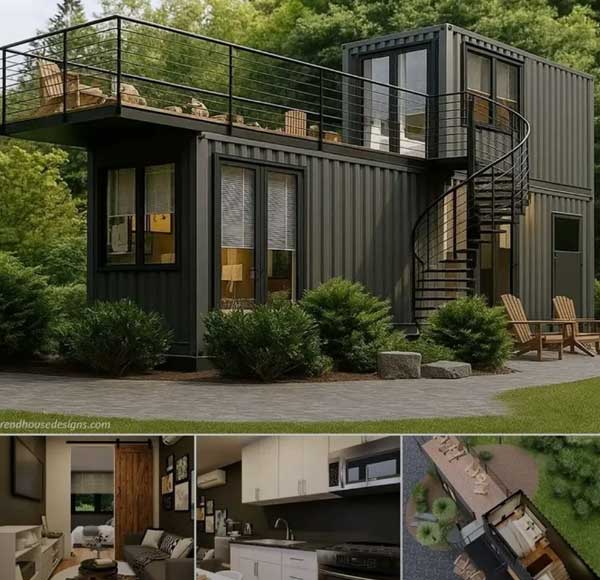
Two-Container Exclusive House
৳1200000~1300000
Two containers joined vertically or end to end create a spacious interior. This layout allows room for a living area, kitchen, bathroom, and one or two bedrooms. Categories: Container House
Two containers joined side by side or end to end create a spacious interior. This layout allows room for a living area, kitchen, bathroom, and one or two bedrooms.
It’s ideal for couples or small families wanting more comfort and functionality while maintaining affordability and a compact footprint.
A Multi-Container House is a residential structure built by joining together two or more ISO shipping containers (typically 20ft or 40ft in length). This modular approach allows for diverse and expansive layouts, moving far beyond the constraints of a single-container dwelling to create true family homes, luxury retreats, or multi-unit developments.
The power lies in treating containers as three-dimensional building blocks.
- Linear Arrangements: Containers placed end-to-end to create longer spans.
- Parallel Arrangements: Containers placed side-by-side, often with the adjoining walls removed to create open-plan, double-width spaces.
- Stacked Arrangements: Containers placed on top of each other (typically up to 6-8 high with engineering) to create multiple stories.
- Angled & Cantilevered Arrangements: For dynamic, architectural statements.
- Hybrid Combinations: Using different container sizes (e.g., a 40ft over a 20ft) to create unique forms and overhangs.
Featues:
- 20 Feet's Long, 8 Feet Width & 8.6 Feet Height
- 2 Bed Room
- Living Room
- Toilet
- Tile flooring
- Sandwich Panel Wall
- Sandwich Panel Roof/celling
- Basic Electrical Setup
- Basic Plumbing Setup
- Use Roof Top Area
- Balcony
- Fascia of exterior decoration
Additional Features (Additional Cost will be added):
- Solar Power System
- Interior Design
- A/C
- Vinyl flooring
- Wooden flooring
Phase 1: Concept & Design (The Most Critical Phase)
- Program & Layout: Defining room requirements and flow. Containers are assigned to functions (e.g., "this 40ft box will be the open-plan kitchen/living," "these two stacked 20fts are the bedrooms").
- Modular Coordination: Designing around the fixed container dimensions (8ft wide internally) to minimize costly cutting. Planning where to remove walls (to join containers) and where to add openings for doors/windows.
- Structural Engineering: Absolutely essential. An engineer must design:
- Foundation: Often a perimeter grade beam or concrete piers that correspond to the container corner castings.
- Inter-Container Connections: How containers will be welded or bolted together to act as one unified structure.
- Load Paths: For stacked designs, ensuring upper containers are properly supported, especially when walls are removed below.
- Steel Reinforcement: For all openings (doors, windows, removed walls) with steel beams (I-beams, tube steel) to maintain structural integrity.
Phase 2: Fabrication & Modification (Can be done Off-Site or On-Site)
- Cutting & Welding: Strategic cutting of openings and removal of walls. All cuts require reinforcement per engineering drawings.
- Sandblasting & Priming: Removing mill scale, rust, and old paint, then applying a corrosion-inhibiting primer.
- Insulation Installation: The most important step for comfort. Common methods:
- Spray Foam Insulation: The gold standard. Provides high R-value, air sealing, and a vapor barrier in one application. Critical for preventing condensation on the steel.
- Panel Systems: Combining rigid foam boards (PIR) with a stud frame for interior finishes.
- Pre-installation: Running preliminary electrical conduit and plumbing chases within framed walls before assembly.
Phase 3: Site Work & Assembly
- Foundation: The engineered foundation is poured and anchored with bolts or weld plates matching the container corner castings.
- Crane Placement: Containers are lifted by crane and precisely positioned.
- Welding & Bracing: Containers are welded together at their corners and along connecting seams. Additional structural bracing is added as required.
- Roof System: A standalone roof (often a lightweight truss system with metal roofing) is typically built over the containers to provide a thermal buffer, drainage, and to protect the container roofs.
Phase 4: Enclosure & Finishes
- Weathertight Shell: Sealing all joints between containers with specialized flashing and sealants.
- Utility Rough-Ins: Completing electrical, plumbing, and HVAC (Mini-split systems are common) installation.
- Interior Finishes: Drywall, flooring, cabinetry, and fixtures transform the industrial shell into a comfortable living space.
- Exterior Cladding: While the corrugated steel can be left exposed, many homes are clad in wood, stucco, or metal siding for enhanced aesthetics and insulation.
Design Innovations & Architectural Potential
- Courtyards & Atriums: Leaving space between container blocks to create protected outdoor rooms, bringing light and air into the center of the home.
- Rooftop Decks & Gardens: Utilizing the flat, strong roof of a ground-floor container as a terrace for a stacked unit.
- Hybrid Construction: Combining containers with conventional wood or steel framing for additions like garages, covered decks, or expansive glass links.
- Dynamic Compositions: Using cantilevers and staggered modules to create dramatic forms that challenge the "boxy" stereotype.
Send a Query
Our Sales team will contact to you, please use active mobile/whatsapp number*
Where we Use
Uses of Sandwich Panel
- 1. Poultry Control Shed
- 2. Agro-based Factory
- 3. Pharmaceutical Facility
- 4. Any type of Garment Factory
- 5. Office and Interior Design
- 6. Resort Cottage / House
- 7. Site Office
- 8. Container Office
- 9. Cold storage
- 10. Food Factory
- 11. Chemical Warehouse
- 12. Generator and Sub-station Room
- 13. Power Plant
- 14. Restaurant Building.
- 15. Residential Roof-Top House.

Sandwich Panel price in Bangladesh
